Setting up a RemoteIoT Web SSH server on Windows 10 has become increasingly popular for remote management and secure communication. With the rise of IoT devices and the need for remote access, having a reliable SSH server is essential. Whether you're a tech enthusiast, a developer, or a small business owner, understanding how to configure your SSH server can significantly enhance your productivity and security.
RemoteIoT technology allows you to connect and manage devices from anywhere in the world. By integrating SSH (Secure Shell) with Windows 10, you can establish a secure connection between your local machine and remote devices. This setup is particularly useful for monitoring IoT devices, troubleshooting networks, or managing servers remotely.
This comprehensive guide will walk you through the process of setting up a RemoteIoT Web SSH server on Windows 10. We'll cover everything from enabling the SSH feature to securing your connections and troubleshooting common issues. Whether you're a beginner or an advanced user, this article will provide you with all the information you need to get started.
Read also:Oxcom A Comprehensive Guide To Understanding The Worlds Leading Blockchain And Crypto Platform
Table of Contents
- Introduction to RemoteIoT Web SSH Server
- Benefits of Using SSH on Windows 10
- Prerequisites for Setting Up SSH
- Installing SSH on Windows 10
- Configuring SSH Server
- Securing Your SSH Server
- Testing Your SSH Connection
- Troubleshooting Common Issues
- Advanced SSH Configurations
- Conclusion and Next Steps
Introduction to RemoteIoT Web SSH Server
What is SSH?
SSH, or Secure Shell, is a cryptographic network protocol that provides a secure way to access remote devices over an unsecured network. It encrypts all data transmitted between the client and the server, ensuring that sensitive information, such as passwords and commands, cannot be intercepted by malicious actors.
RemoteIoT Web SSH server is a powerful tool for managing IoT devices and networks remotely. By combining SSH with Windows 10, you can create a robust platform for secure communication and remote access.
Why Use SSH for RemoteIoT?
Using SSH for RemoteIoT applications offers several advantages:
- Encryption for secure communication
- Authentication mechanisms to ensure only authorized users can access the system
- Support for file transfer using SCP (Secure Copy Protocol) and SFTP (SSH File Transfer Protocol)
- Compatibility with a wide range of devices and operating systems
Benefits of Using SSH on Windows 10
Enabling SSH on Windows 10 provides numerous benefits for both personal and professional use. Here are some of the key advantages:
- Enhanced Security: SSH encrypts all data transmissions, protecting sensitive information from cyber threats.
- Remote Access: With SSH, you can access your Windows 10 machine from anywhere in the world, making it ideal for remote work and IoT management.
- Automation: SSH allows you to automate tasks and scripts, streamlining your workflow and reducing manual effort.
- Compatibility: SSH is widely supported across various platforms, ensuring seamless integration with different devices and systems.
Prerequisites for Setting Up SSH
Before you begin setting up your RemoteIoT Web SSH server on Windows 10, ensure that you have the following prerequisites in place:
System Requirements
- Windows 10 (version 1809 or later)
- An active internet connection
- Administrative privileges on your machine
Software Requirements
- OpenSSH Server (built-in on Windows 10)
- A client application (e.g., PuTTY, WinSCP, or any SSH client)
Installing SSH on Windows 10
Enabling OpenSSH Server
Windows 10 includes OpenSSH Server as an optional feature. To enable it, follow these steps:
Read also:Comprehensive Guide To Remoteiot Vpc Download Unlocking Potential For Your Business
- Open the Start menu and search for "Turn Windows features on or off."
- In the dialog box, scroll down and check the box next to "OpenSSH Server."
- Click "OK" and restart your computer if prompted.
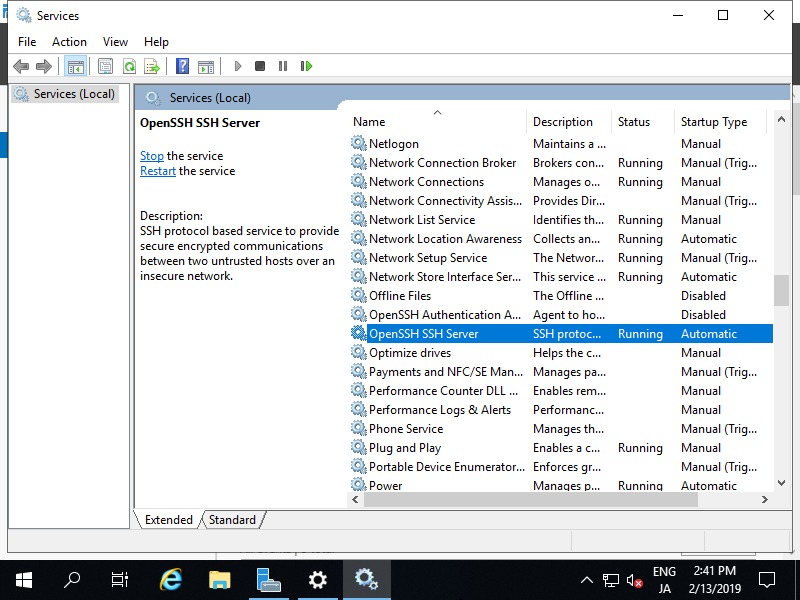
Verifying Installation
Once the installation is complete, verify that the SSH server is running by opening a Command Prompt and typing:
netstat -an | findstr 22
This command checks if the SSH server is listening on port 22, the default port for SSH connections.
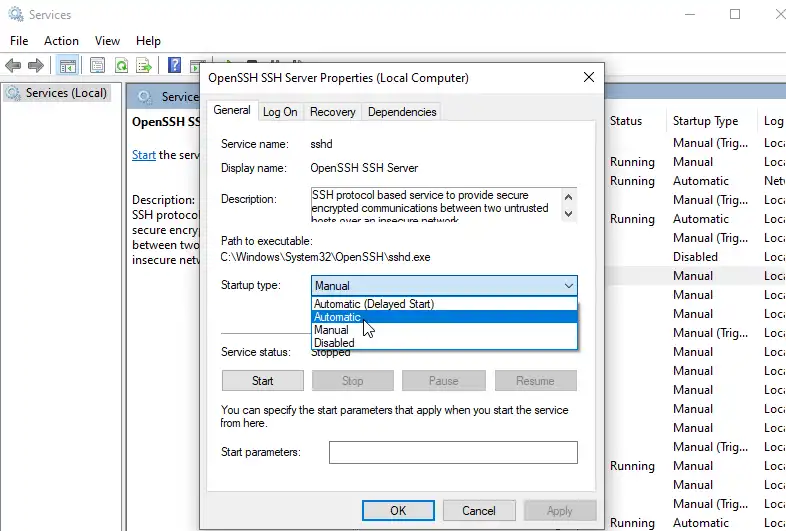
Configuring SSH Server
Editing SSH Configuration File
The SSH server configuration file is located at:
C:\ProgramData\ssh\sshd_config
To configure your SSH server, follow these steps:
- Open the sshd_config file using a text editor with administrative privileges.
- Modify the settings as needed. For example, you can change the port number, disable password authentication, or enable public key authentication.
- Save the file and restart the SSH service using the following command:
Restart-Service sshd
Setting Up User Permissions
To ensure security, it's important to define user permissions for your SSH server. You can do this by:
- Creating separate user accounts for each authorized user.
- Assigning appropriate permissions to each user account.
- Restricting access to specific directories or files if necessary.
Securing Your SSH Server
Using Strong Passwords
One of the simplest ways to secure your SSH server is by using strong passwords. A strong password should:
- Be at least 12 characters long.
- Include a mix of uppercase and lowercase letters, numbers, and special characters.
- Avoid common words or phrases.
Implementing Public Key Authentication
Public key authentication is a more secure alternative to password-based authentication. To set it up:
- Generate a public-private key pair using a tool like PuTTYgen.
- Copy the public key to the authorized_keys file on your server.
- Disable password authentication in the sshd_config file.
Testing Your SSH Connection
Once your SSH server is configured, it's time to test the connection. Follow these steps:
- Open your SSH client and enter the server's IP address.
- Log in using your username and password (or public key).
- Run a simple command, such as "dir" or "ls," to verify that the connection is working.
If the connection is successful, you should see the output of the command in your client window.
Troubleshooting Common Issues
Connection Refused
If you receive a "Connection refused" error, check the following:
- Ensure that the SSH service is running on your server.
- Verify that the firewall is not blocking port 22.
- Double-check the server's IP address and port number.
Authentication Failure
If you're unable to authenticate, try the following:
- Make sure that your username and password are correct.
- Check the sshd_config file for any misconfigurations.
- Ensure that public key authentication is set up correctly if you're using it.
Advanced SSH Configurations
Port Forwarding
Port forwarding allows you to access your SSH server through a different port. To configure port forwarding:
- Edit the sshd_config file and change the Port setting to your desired number.
- Restart the SSH service to apply the changes.
- Update your firewall rules to allow traffic on the new port.
Setting Up SSH Tunnels
SSH tunnels provide a secure way to forward traffic between your local machine and the server. To set up an SSH tunnel:
- Use the -L or -R option in your SSH client to specify the local and remote ports.
- Test the tunnel by connecting to the specified ports.
Conclusion and Next Steps
Setting up a RemoteIoT Web SSH server on Windows 10 is a straightforward process that can greatly enhance your remote management capabilities. By following the steps outlined in this guide, you can ensure that your SSH server is secure, efficient, and reliable.
To take your skills to the next level, consider exploring advanced SSH configurations, such as port forwarding and tunneling. These features can provide additional flexibility and security for your remote connections.
We encourage you to share your thoughts and experiences in the comments section below. If you found this article helpful, please share it with others who may benefit from it. For more in-depth guides and tutorials, explore our other articles on our website.
Sources: